Well, we did it! We have officially checked off our first family trip & first time flying with Charli! Just like doing anything for the first time, it was a little nerve-wracking/stressful and it took a lot of planning, but we survived! Honesty, I’m really glad we decided to knock out Charli’s first trip so early on. I feel much more prepared now that we’ve done it, and we do travel quite a bit because both of our families are out of state – so it was important to us for Charli to get comfortable with flying early on. For reference when reading the rest of this blog post, Charli was about 2.5 months on our first trip. We took about a two hour direct flight to Nashville from Austin. I felt good about the distance for her first time flying – not too short or not too long of a flight, without any layovers!
A lot of my mama friends (and people on the internet) said that traveling at this age is much easier than traveling with a toddler – you don’t really have to worry about entertaining them, tons of gear, snacks, etc. – which was so true! I would say it wasn’t a *total* breeze at 2.5 months – but it was nice not worring about snacks, gear & lots of toys!
I’m a very type A, planner kind-of-gal – so weeks leading up to our trip, I did tons of research on tips & tricks when it comes to traveling with a newborn, printed out packing lists & made sure we were prepared for just about anything. Overall, I think it all went pretty smoothly so I thought it would be helpful for other new parents if I shared some pointers we picked up along the way, answers to questions I had myself, and some products that really came in handy throughout our trip. I hope this helps! YOU GOT THIS. Safe travels! xo
Booking The Trip
I did lots of research on the best way to travel comfortably with a newborn – and there are a few options depending on how much you want to spend. On most airlines, if your child is under the age of 2, they can travel as an “infant on lap”. This is what we did. We flew American Airlines and it was free of charge – all I had to do was check the “infant on lap” option when booking our ticket online. If that isn’t an option when booking for you, you can always call the airline ahead of time and let them know you’ll have an infant on lap. We didn’t need any paperwork or form of an ID for Charli.
Now, here’s where the money comes in, haha! Of course, you can just travel per usual and have your baby on your lap – but sometimes it can get a little cramped & uncomfortable if you are next to strangers. So, we decided (especially for our first trip) to upgrade to first class so we would have more room, and so we wouldn’t be disturbing anyone else in our row if she was fussy or crying. It was definitely worth it – and being in the front of the plane was also really convenient.
Another option if you are okay with spending a little more, is to buy your baby their own seat next to yours. Of course as a newborn they obviously won’t be sitting in the seat (however you can put their carseat on the seat & keep them in there for the duration of the flight!) – but again, it gives you extra space and guarantees you won’t have someone next to you…which is nice if they get fussy.
Both options require spending more money, so I know it’s not for everyone. But, if you can budget or swing the extra expense – the additional room is SO worth it!
Packing
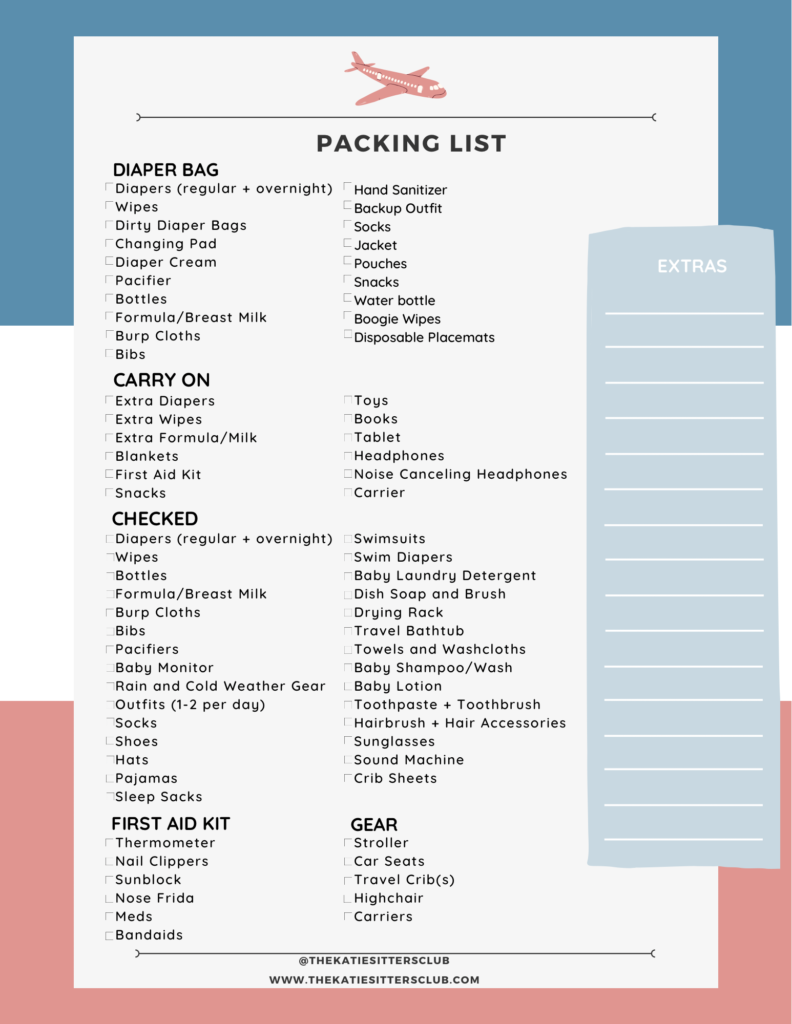
Usually, I am a last minute packer…but not anymore, ha! Packing for a newborn requires quite a bit of planning and can be overwhelming especially the first time. I had no idea how many diapers, outfits, burp clothes, etc. to pack! This time around, I definitely overpacked – but hey, I’d rather be prepared and have more of something than not enough. I packed about 10 diapers for each day, and had plenty left over. I found a really great packing list on Pinterest from @TheKatieSittersClub, and it really helped guide me and make sure I didn’t forget anything!
Something that was GAME-CHANGING when it came to packing & gear, was Babyquip. It is truly the best concept and service for parents EVER! It’s like Airbnb – for baby gear. Local moms all across the country rent out their baby gear – everything from bassinets, to toys, to beach gear, high chairs, strollers, carseats, baths and more. You can rent pretty much ANYTHING so you don’t have to haul it, check it and bang it up while traveling! We had the best experience with Babyquip during this trip. I rented a Snoo bassinet for Charli – and the sweet mama who we rented it from delivered it straight to our hotel room so it was set up and ready for us when we got in late that evening. Last minute, I had her also add on a baby swing to our reservation, and she brought that as well. She picked all the gear up after we checked out – and it was the easiest process ever. It helped get us some quality sleep while traveling because the Snoo was a familiar space for Charli. We will use Babyquip for ALL of our trips!
Breastfeeding/Pumping
This is probably the thing that stressed me out the most leading up to the trip. Right now I am still breastfeeding Charli – I would say 90% nursing, 10% bottle feeding. While it can be stressful, it was relieving to know that I always had my boob (lol), so I’d always have milk to feed Charli. I was more so stressed about getting off schedule, getting engorged and ending up with a clogged duct or mastitis. This was a busy, on-the-go trip for us, and in some cases…we would be leaving Charli with my mom for a few hours. It took some extra planning & pumping, but the trip was a success when it came to breastfeeding & pumping. Here’s what it looked like for me:
TRAVEL DAYS
– Arrived at the airport extra early & breastfed her in the car once we got the airport.
– Packed one bottle of pumped milk to give her during take off & touchdown to help alleviate any ear-popping discomfort. On the way back, I packed 2. (I recommend packing more than you think you need!)
– Packed three frozen bags of breastmilk to have just in case my pumps weren’t enough, or I didn’t have time to pump before leaving her with my mom. (more on traveling with frozen milk in a minute!)
– Breastfed her once we got in our rental car in Nashville, and she was good until we got to the hotel!
EACH DAY
– Breastfed her per usual as long as I was with her.
– Pumped once before I went to bed to create bottles for the next day!
I actually didn’t even end up using the frozen milk – but I’m glad that I brought it for backup!
TRAVELING WITH BREASTMILK (frozen & not frozen)
I bought a mini insulated lunch box for transporting the frozen milk, and it was perfect! I just put a ziplock baggie of ice in it, along with the frozen milk and it stayed frozen the entire trip from start to finish. I had it in my carry-on, and had no issues going through TSA. I just told them ahead of time that I had frozen breastmilk in my bag. Same for the bottles of breastmilk, I just gave them a heads up and there were no issues!
TRAVELING & PUMPING
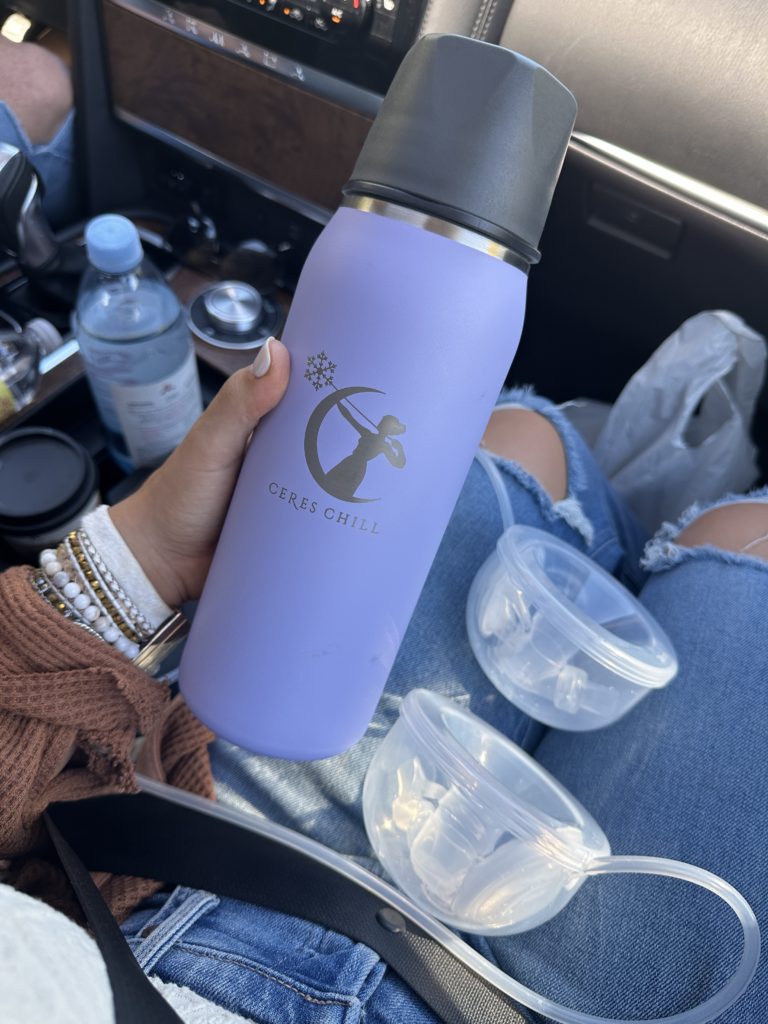
I did a lot of pumping in the car & on-the-go during this trip. My Willow pumps haven’t been the most reliable, so I packed my Spectra S1 for this trip. I packed my wearable CaraCups for the Spectra, which can easily slip into whatever bra I’m wearing…which was convenient for pumps in the car! As far as storage for pumped milk went when we were on-the-go, I kept my pumped milk in this Ceres Chill Storage Container. It keeps your milk at safe temperatures for 20+ hours! I requested a mini fridge for our hotel room, so I kept pumped milk & bottles in there once we got back to the room.
TSA & The Airport


This part was a breeze! Once we got to the airport, I put on my Artipoppe carrier and wore her through security. I didn’t have to take her out, I had my hands free which was great, and got to go through with no problem. After we got through, we put her in the Doona stroller and from there it was a piece of cake! I definitely recommend wearing your baby through security – it’s much easier than getting them in & out of the carseat! Another tip: dress your baby in footie pajamas so they are comfy, and you don’t have to worry about their feet getting cold or socks/shoes falling off!
The Flight


I think the most stressful part about flying with a newborn is just the unknown & unpredictability. Most of my stress came from *me* worrying about her screaming or irritating people on the plane. But overall, people were SO nice and understanding that traveling with a newborn isn’t always a piece of cake. The first flight was much more stressful than the way back. I offered her a bottle on the way up & we had no problems! I didn’t think she would take the *whole* bottle because she ate right when we got to the airport…but, she slugged that entire sucker down! I got a little stressed because I didn’t have anything for her on the way down, but I knew that if we were in a crying crisis I could whip my boob out. Well, surely enough – on the descend, she started to get really upset (I think because of her poor ears popping)…so I whipped out the ol’ boob and she was too upset to latch. It was stressful, but everyone was really nice and it only lasted about 20 minutes. But those twenty minutes were hard!
On the flight back, I made sure we were *over* prepared. I packed two bottles & gave her Tylenol about 30 minutes before the flight to combat any ear discomfort. She still got a little fussy on the way down, but overall – she did much better! We did have an in-flight poopy diaper situation, which was fun…haha! Most airplane bathrooms *do* have changing tables that fold down right above the toilet, though. I didn’t notice them until I was a mom!
Best piece of advice = a little Tylenol before the flight, and have enough milk for them to drink on the way up & down. Oh, and give yourself some grace if you baby starts to get fussy. Most people are so nice and understanding…& wear headphones anyway, lol!
Helpful Products + Gear


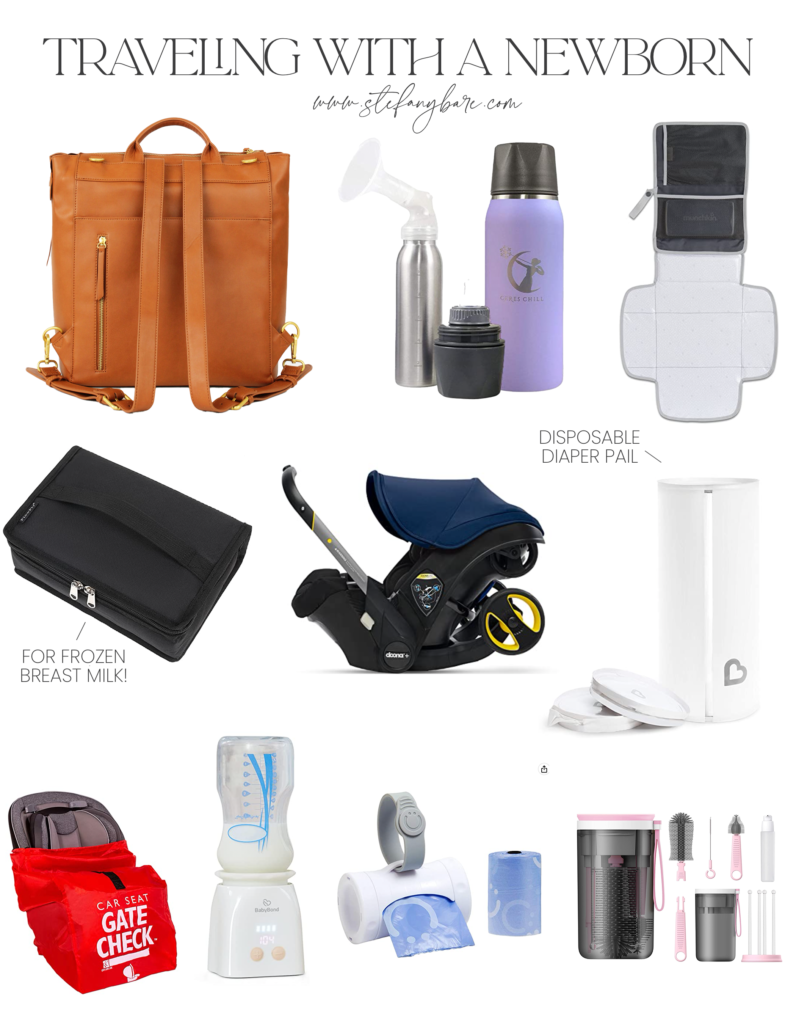
Fawn Design Square Diaper Bag Backpack // This was the diaper bag I brought while traveling because it’s much larger than our everyday one! It held everything, was comfortable to carry through the airport, and it’s super cute & durable! **I have a 20% discount code for any Fawn Design bag – use code STEFANY20 at checkout!
Ceres Chill Breastmilk Storage Container // This is the cooler tumbler I brought to store pumped milk in when I was pumping on-the-go! It keeps the milk at safe temperatures for 20+ hours.
Munchkin Portable Diaper Changing Kit // We used this the entire trip! It was great to use on the changing stations in the car, airport & the airplane – and we also used this as our makeshift changing station on a bench in our hotel room! I love that it has storage for wipes and diapers, so you have everything you need!
Mini Insulated Lunch Box // I used this to travel with bags of frozen breastmilk. I just put one ziplock baggie filled with ice in it along with the frozen milk, and it stayed frozen the whole day!
Doona Infant Car Seat & Stroller // I went back & forth a lot before our trip about bringing either the Doona or our UppaBaby stroller…and ultimately we went with the Doona for convenience. Mainly because we didn’t need to bring a base for our rental car – the Doona is able to safely be installed with a double loop seatbelt. I’m happy with our decision! It made getting through the airport easy. We just gate-checked it before boarding our flight.
Travel Diaper Bag Dispenser // It’s like poop bags, but for your baby’s diapers! These were helpful for when we were in the car and didn’t have anywhere to throw away a dirty diaper. These bags block all the smell!
Disposable Diaper Pail // Because you don’t know how bad dirty diapers smell until you throw them in normal trash can, haha! These disposable travel diaper pails are AMAZING! The hold up to 30 diapers, conceal the smell & fold down into nothing. These were SO helpful for in the hotel!
Gate Check Bag for Carseats // This is the bag we threw over the Doona before gate checking it. It fits most carseats! It kept it safe & covered and was easy to identify once we landed and picked it up.
Portable Bottle Warmer // Luckily Charli isn’t picky about the temperature of her bottles, but this was nice to have if the milk was very chilled and needed to be warmed up a bit. I had to buy an adapter for our Tommee Tippee bottles, but it did the trick & worked great!
Mini Travel Bottle Cleaner Brush Set // This little brush cleaning set was AMAZING! I had to wash all of her bottles & my pump parts in the hotel bathroom, so I set up a little cleaning/drying station in there with this kit! It has everything you need – a scrub brush, drying rack, bottle nipple brush & soap dispenser. It’s very compact & gets the job done!